Firefight Game Guide Beta

Welcome to the Firefight 2nd Edition Game Guide! This tool takes you and a friend through your first games of Firefight, giving you the information you need at the point you need it, just like an in-store demo! We've even provided a cool battle sound track to listen to above.

Start Game

Before you begin

The best starting point for you and a friend to play Firefight is undoubtedly one of our 2-Player Starter Sets, as seen below. All the Firefight Starter sets contain the same; 2 armies, a rulebook and token set, Command Dice and d8's. Just choose the set which contains the factions that most interest you!


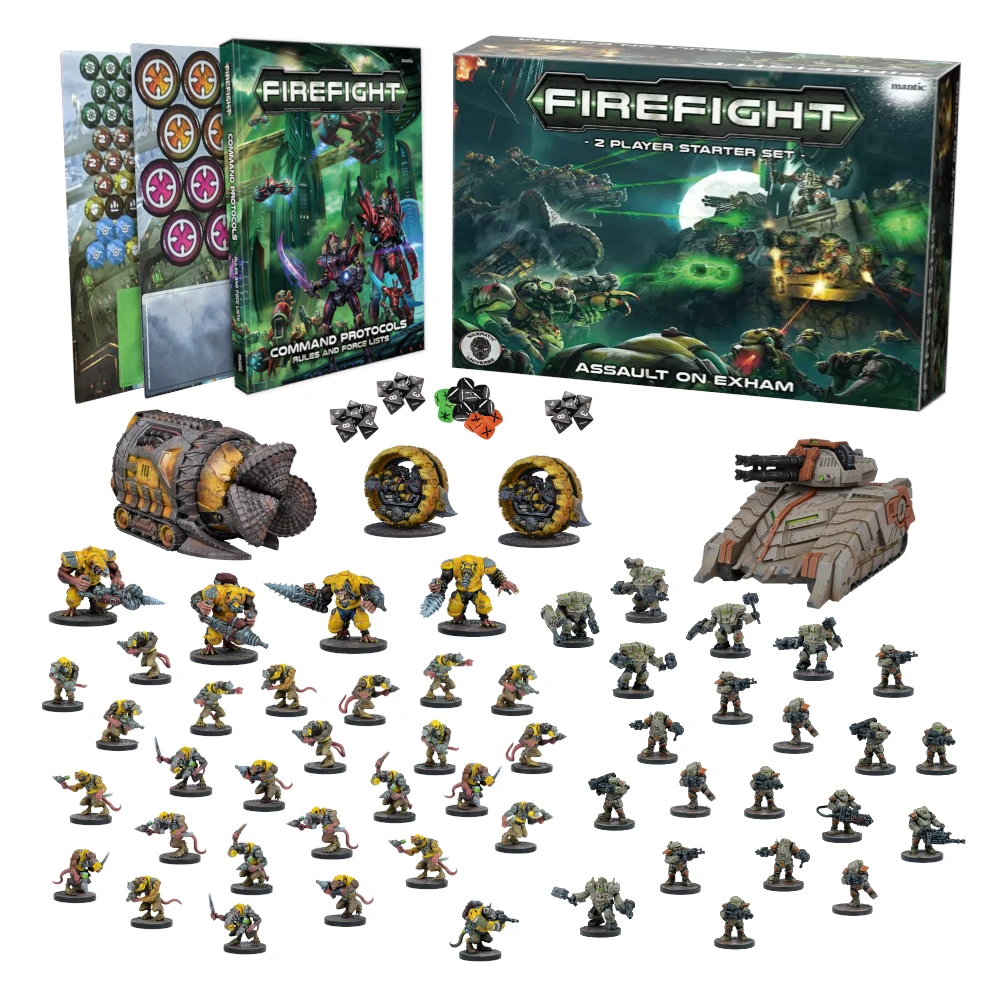
Assault on Exham 2-Player Starter Set
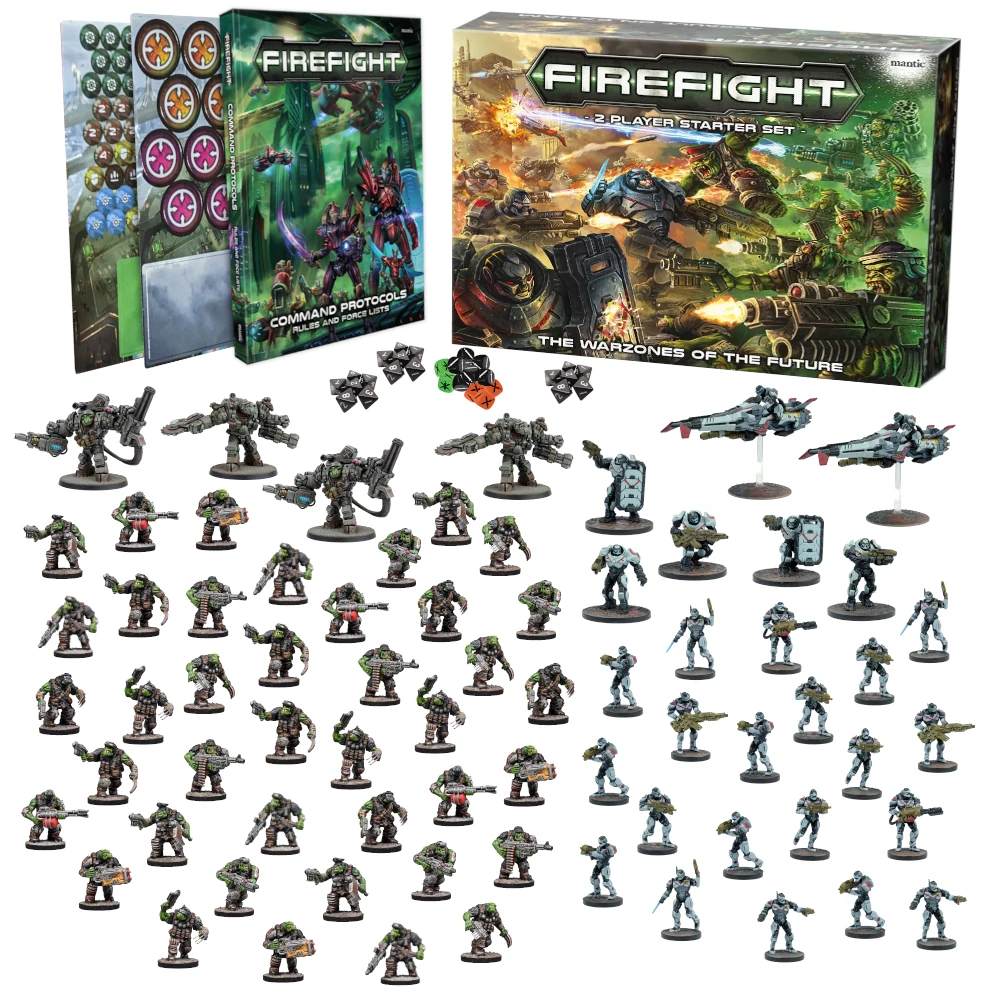
Battle of Cabot III 2-Player Starter Set

Visit Webstore


Build your Strike Force

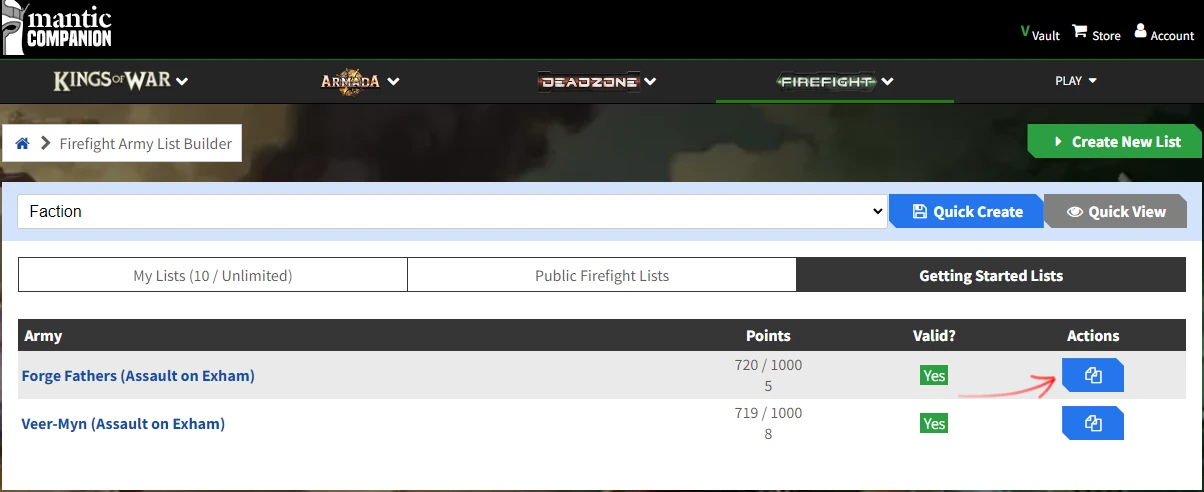
For your first games of Firefight, use the free, pre-made force lists found on the Firefight List Builder > Getting Started section. Simply duplicate the list into your collection - this is now your copy to use!

Firefight List Buidler


Go to List Builder


Set up your play space

You'll need at least a 4' X 4' area to play a small game of Firefight. We'd recommend using the layout as seen in the Command Protocols big rulebook:


Browse Terrain


Ready for battle!

You're good to go! With minis assembled, dice in hand and tape measure at the ready, click the button below and follow the steps and actions as they present themsevles:

Start Game

Setup and Who Goes First?

Firefight is played using the following sequence:

  1. Set Up
  2. Deployment
  3. Rounds
    1. Generate the Command Pool
    2. Take alternating Turns activating units
    3. End Phase
  4. Determine the Winner!

Action - Decide who goes first...

Both players make a Recon Roll:

Firefight Command Dice

Each player rolls a number of Command Dice equal to those provided by Command units in their Strike Force and compare their total scores. Re-roll in the case of a draw...The player with the highest score is the winner and may choose to have the Initiative or give it to their opponent.
For example, if an army contains a single Leader unit, and that units has Tactician(1 Green), then that player will roll a single green Command Dice.

From this point onwards, the player who has the Initiative as a result of this Recon Roll, will be called Player 1, and the other Player 2.

Next: Deployment

Deployment

Now is the time to bring your miniatures to bear on a warzone of the future!

Action - Deploy!

Both players add their models to the table:

The player with the Initiative places (deploys) their entire Strike Force onto the table, unit by unit, wholly in their deployment area...Their opponent then does the same for their Strike Force.
Deploy your units anywhere wholly 12 inches away from the centre line, on your table edge (see below).

Click these links to read more about: Coherency and Deployment

For this guided game, we'll play Scenario #1 - Scourge - a fight to the death! You won't need objective markers. The Scourge Scenario rules are:

GAME LENGTH

The game will last 5 Rounds.

VICTORY CONDITIONS

At the end of each Round, each player scores 3VPs if they have Destroyed one or more enemy units that Round, 3VPs if none of their own units have been Destroyed that Round, and 2VPs if they have Destroyed more units than their opponent in that Round. Once per game, a player can score a further 10VPs if they destroy their opponent’s most expensive unit (points value). If more than one unit is tied for most expensive, any of those units will count for the once per game 10VPs. The player with the most VPs at the end of the game is the winner.


With your miniatures deployed, the game now progresses into the Round loop, with each Round starting by generating Command Points:

Next: Command Points

Back: Setup

Command Points

Before each Round, both players also need to generate the pool of Command Points they can bring to bear when activating their units using special actions called Orders.

Action - Generating the Command Pool!

Firefight Command Dice

At the start of each Round both players create their Command Dice Pool by taking three BLACK Command Dice. Additional dice of the appropriate colour (BLACK, ORANGE or GREEN as shown on a unit’s profile) are added to the roll for any of their units In Play with the Tactician Keyword...Each player rolls all of their Command Dice and adds up the Command Points. This is the total number of Command Points you have available for the Round about to be played. You may re-roll one Command Die for each Command unit you have In Play.
Click these links to read more about: Command Points

Next: Activations

Back: Deployment

Activations

This is the hub for Unit Activation. If this is the first Activation of the Round, Player 1 chooses a unit to activate.

Players then take alternating Turns to activate a single unit...During each of these Turns a player gets to do something (act) with one of their units. Each unit in a player’s Strike Force only gets to act once in each Round and players must activate a unit if able during a Round. Once a unit has finished acting, the unit is marked as Activated.

Actions

Each unit in Firefight may perform up to two short actions or a single long action during its activation. A unit may not repeat an action during the same activation. A unit may also be activated to Halt and do nothing should a player wish.

Action - Choose your Action!

From the following list, choose an Action you'd like your Activated Unit to perform:

Shoot / Blaze Away (Short)

Advance (Short)

Hit the Dirt (Short)

Steady Aim (Long)

Sprint (Long)

Overwatch (Short)

Generic or Faction Order (None)

Command Order (None)

Assault (None)

Once this unit has Activated, place an Activated Token next to it, and play passes to your opponent to Activate one of their Units. Once all Units have activated, proceed to the End phase below:

Next: End Phase

Back: Command Points

Shoot / Blaze Away / Steady Aim

Resolve your action in the following sequence:

  1. Check Line of Sight
  2. Check Range
  3. Determine number of Dice
  4. Roll to Hit
  5. Roll to Damage
  6. Remove Casualties

1. Action - Check Line of Sight

Click this link to read the section: Line of Sight

The important aspect to determine is whether or not the firing unit has Clear or Partially Blocked Line of Sight.

2. Action - Check Weapon Range

Measure the distance between the base of the Leader model of the shooting unit and the base of the closest model within Clear or Partially Blocked LOS in the target unit to determine the range. All weapons in the shooting unit that have a listed range equal to or greater than the distance measured to the target, are eligible to fire.
Click this link to read more about: Weapon Range

3. Action - Determine Number of Dice

Take a number of D8s equal to the dice value of each eligible weapon being used by the shooting unit.
Click this link to read more about: Determine Number of Dice

4. Action - Roll to Hit

Roll the dice and apply any relevant modifiers to the results. Any dice that then equal or exceed the Shoot value of the firing unit, will each result in a hit. Modifiers are cumulative, unless specified otherwise...rolls of 8 are always a success irrespective of the Shoot value or modifiers. Natural rolls of 1 always miss (but may still be re-rolled by some Keywords).

When rolling to hit, apply the following modifiers to your dice rolls:

-1 Tagret is in Cover
-1 Target is Small Unit
-1 Target is a Vehicle with the Fly Keyword
-1 Target has the Stealthy Keyword
-1 Target has Hit the Dirt

5. Action - Roll to Damage

For each hit, take a die and roll again. Any dice that equal or exceed the Armour value of the target unit will each result in causing a point of damage on the target unit. The AP (Armour Piercing) of weapons that hit in a Shoot action will reduce the Armour value of the target unit by an amount equal to the AP of the firing weapon, improving the chance to damage. For example, an AP of 1, would reduce Armour of 6+, to 5+.
Click this link to read more about: Roll to Damage

6. Action - Remove Casualties

When a model has been allocated as many points of damage as it has Health Points (HP) on its profile, the model is removed from play (dead). Damage must be allocated to remove whole models before allocating to another model.
Click this link to read more about: Remove Casualties

Blaze Away

Action - Blaze Away

Weapons without the Blaze Away Keyword may not be used...Follow the standard steps for LOS, range, number of dice etc. However, no modifiers are used and hits are only scored on natural rolls of 8, regardless of the firing unit’s Shoot stat. Damage and casualties are resolved as normal (see above). If at least one hit is scored the target unit will gain a Pin Marker.
Click this link to read more about: Blaze Away

Steady Aim

Action - Steady Aim

This unit may perform a Shoot action following all the normal rules for that action and using weapons without the Slow keyword, but also benefits from ignoring any single -1 to hit modifier (such as In Cover or Hit The Dirt).

Note: There are extended rules and considerations that may come up during the game. Click this link to read more about: Ranged Combat

Back to: Activations

Movement: Advance or Sprint

Action - Move your models!

...measure the distance from the edge of the Leader model’s base and move the Leader model up to the maximum it can move for the action being performed. This move can be in a straight line, or curved to avoid other models or terrain. Once the Leader model is in position, move all the other models in the unit back to within Coherency from the Leader.
For an Advance Action, move up to the first of its Speed stat values, for a Sprint Action, move up to the second of its Speed stat values.

Optional:

Action -Assault!

If you have moved your Leader Model into contact with an enemy unit model, you now initiate an Assault:

Assault!

Note: There are extended rules and considerations that may come up during the game. Click this link to read more about: Movement

Back to: Activations

Hit the Dirt!

Action - Hit the Dirt!

Units may choose to Hit the Dirt...If they do this, enemy units suffer a -1 to hit modifier for any Shoot or Steady Aim actions which target them until the unit next activates...Units with the Bulky, Construct, Fly, Wheeled, Vehicle or Walker keywords cannot Hit the Dirt.

Back to: Activations

Overwatch

Action - Overwatch

Mark the unit as activated, however, if they are Assaulted this Round then the unit may still perform an Assault Reaction if it has one.

Note: There are extended rules and considerations that may come up during the game. Click this link to read more about: Overwatch

Back to: Activations

Faction and Command Orders

Action - Faction Orders

A unit may only benefit from a single Order per Activation...Faction Orders may be given to units that are In Play and not Pinned at the start of the activation...and if the unit is within 12” of a friendly Command model...spend the appropriate Command Point(s) for the Order at the point the Order would be applied...Each Faction Order may only be used once per Round.

Action - Command Orders

Like all Orders these Command Orders also require Command Points to use them. A single Command Order may be used during a Command unit’s activation, if it is not Pinned. The Order may be used before or after, but not during, an action.

Note: There are extended rules and considerations that may come up during the game. Click this link to read more about: Orders

Back to: Activations

Assault

Resolve your Assault in the following sequence:

  1. Determine Charge Type
  2. Assault Reactions
  3. Move into Assault
  4. Roll to Hit
  5. Roll to Damage
  6. Remove Casualties
  7. Fighting Back
  8. Assault Resolution

1. Action - Determine Charge Type

The unit...now Assaulting the enemy...is deemed the Attacker. The unit being assaulted is the Defender... The player initiating the Assault must declare this before any movement is made to allow their opponent to declare any Assault Reaction in response... If a unit initiated an Assault using a Sprint action it is called a Charge... A Charge is considered to be Hindered in any of the following circumstances:
  • The Charging unit does not have LOS to the target unit before it moves (LOS is Blocked).
  • The Charge movement (from Leader to target) is not in a straight line (e.g. the Leader had to run around another unit or terrain feature).
  • The Charge movement (from Leader to target) travels through or over any Difficult Terrain or Obstacle, or engages an enemy unit across an Obstacle it is in contact with, or that is within a building.
  • The Charge movement originated within a Building, Transport Vehicle or from an area off-table, such as arriving from Reserve.
Click this link to read more about: Assault, Line of Sight

2. Action - Assault Reactions

Any un-Activated and non-Pinned unit that would be contacted as part of an Assault, has an opportunity to react before the Assaulting unit moves. This is called an Assault Reacton...

The Assault Reaction will be listed on the Unit Profile as one of the following: Supressive Fire, Evade, Controlled Fire or Counter Charge.

Click this link to read more about: Assault Reactions

3. Action - Move into Assault

...complete the move of the Assaulting unit into contact.

Note, a valid result of an Assault Reaction might be a now Failed Assault! Click this link to read more about: Failed Assaults

4. Action - Roll to Hit

Roll the dice and apply any relevant modifiers to the results. Any dice that then equal or exceed the Shoot value of the firing unit, will each result in a hit. Modifiers are cumulative, unless specified otherwise...rolls of 8 are always a success irrespective of the Shoot value or modifiers. Natural rolls of 1 always miss (but may still be re-rolled by some Keywords).

When rolling to hit, apply the following modifiers to your dice rolls:

+1 to hit for an Assaulting unit which has Charged (not if Hindered)
-1 to hit for an Assaulting unit which did not have LOS to the Defending unit when initiating the Charge
-1 to hit for an Assaulting or Defending unit which is Pinned
-1 to hit for a Defending unit which has Hit The Dirt

Any model in Unit Coherency with the Leader Model may fight.

Click these links to read more about: Coherency

5. Action - Roll to Damage

For each hit, take a die and roll again. Any dice that equal or exceed the Armour value of the target unit will each result in causing a point of damage on the target unit. The AP (Armour Piercing) of weapons that hit in a Shoot action will reduce the Armour value of the target unit by an amount equal to the AP of the firing weapon, improving the chance to damage. For example, an AP of 1, would reduce Armour of 6+, to 5+.
Click this link to read more about: Roll to Damage

6. Action - Remove Casualties

When a model has been allocated as many points of damage as it has Health Points (HP) on its profile, the model is removed from play (dead). Damage must be allocated to remove whole models before allocating to another model.
Click this link to read more about: Remove Casualties

7. Action - Fight Back

After resolving all attacks with the first unit (usually the Attacker), the other unit now rolls its attacks in the same way, as described above, adjusted for any models that may have been removed as casualties.

8. Action - Assault Resolution

Once both sides have struck their blows, total up all the points of damage caused by both the Attacker and Defender during the assault, and include any additions due to Assault Reactions. If both units are still present, the one which caused the most damage is the winner. The other is the loser.
Loser

If one unit has been destroyed, with all its models removed as casualties, it has automatically lost. Assuming it has models remaining, the losing unit in an Assault is marked as Activated and gains a Pin Marker and must remove its Hit the Dirt Marker if it has one. In addition, it must then withdraw 6” Directly Away from the winning unit, remaining 1” from enemy units, and leave any terrain or building it was within if able.

Draw

If the Assault is a draw or no damage has been caused by either side, then both units move 3” Directly Away from each other. Determine the direction of travel for both and then move the Defending unit first. Both units are then marked as Activated and both gain a Pin Marker.

Winner

The winning unit in an Assault may make a 3” consolidation move in any direction, remaining 1” from enemy units. The consolidation move may not be into a Transport Vehicle or building, but may be into other terrain. The winning unit may immediately remove a Pin Marker if it has one. If the losing unit was occupying terrain the winner may move to occupy the same terrain feature as part of its consolidation move, if the Leader can reach it.

Note: There are extended rules and considerations that may come up during the game. Click this link to read more about: Assaults

Back to: Activations

End Phase

The Round concludes with the End Phase. The player who finished activating first will have the Initiative for the next Round and completes steps 1 to 3 below. Their opponent then does the same.

  1. Remove Pin Markers
  2. Perform a Nerve test for each Broken unit.
  3. Remove tokens.
  4. Count Victory Points (depending on mission) and determine if the victory conditions have been met. If not, continue play for another Round.

1. Action - Remove Pin Markers

Remove Pin Markers from friendly units by spending Command Points. Each Command Point spent removes one Pin Marker. Then resolve the effects of the Shield Generator and Regeneration Keywords.

2. Action - Perform Nerve Tests

To perform a Nerve test roll a single D8, using the modifiers listed below. Modifiers are cumulative, unless specified otherwise. Natural rolls of 8 are always a success irrespective of the unit’s Nerve value or modifiers. Natural rolls of 1 are always a failure. If the unit has the Inspiring (self) Keyword, or is within range of a unit with the Inspiring or Very Inspiring Keywords, it may re-roll a failed Nerve test.
-1 The unit is Pinned
-2 The unit is now the single remaining model from a Troop or Specialist unit.
+1 The unit is in a Building
If the result equals or exceeds the Nerve value of the unit, the Nerve test is passed and the unit suffers no further effect, although the unit will keep its Pin Marker if it had one.
Note, Broken Units are units with less than 50% of their models remaining.

3. Action - Remove Tokens

Remove all Activation Markers and any other tokens that only last for the Round.

3. Action - Count Victory Points

Count Victory Points (depending on mission) and determine if the victory conditions have been met. If not, continue play for another Round.

If the game is over - congratulations! You've made it through, and here's to many more! If you're still playing Rounds - go ahead and start back at generating your Command Points and continue from there.

Next: Command Points

Back: Activations


By continuing to use this website, you agree to our use of necessary cookies. Cookie Policy